Five questions you didn’t think to ask your photographer (But really should)
Five important questions to ask your photographer before you event or wedding and how I answer those questions!

The groom, his mother, and sister watch the bride and her father walk down the aisle.
Okay, you have a wedding or big corporate event, or need to get a portrait taken and are ready to book and you begin to google search for “photographers near me” or you are searching hashtags on instagram but there are just so many options and its hard to separate the truly professional from the simply talented. That professionalism is important when you are dealing with a one time event and need everything to go right!
Now I come from a big family - a really big family, so when anyone of my couple dozen cousins come asking about wedding photography I kindly tell them I would rather be a guest than working on their big day! BUT I will then give them this same advice when they begin their search for a photographer. So I hope this will help you feel empowered and confident when choosing your next photographer - even if thats not me!
What is your backup strategy?
This question is all about their reliability. A good photographer will tell you how they regularly network with a handful of photographers in the area in case they are sick or have to miss the day, etc. A professional will also tell you how they manage the digital files and what they do incase of a hardware failure. There should be at least one duplicate of everything at all times, from the moment they click the shutter to when they send you the images.
My Answer:
Both of my cameras have two memory cards, the second mirrors the first. When I get home, one card goes in a safe box on my desk where it will not be touched until the photos have been processed and backed up again, the other is the one I use to download to my hard-drive where the images will be processed. Once the photos are edited I upload them to your gallery, and backup to my external hard drive. At no point in time are there less than two instances of your photographs. I also have duplicates of all my flashes, lenses, batteries, and memory cards.
I have yet to miss a wedding or a photo date but in the unlikely occasion that I am sick or injured, there are 3 photographers in the local area I trust and will vouch for their talent. I have been working with them very closely for the last 5 years and know their style and workflow is similar to my own! If they all happen to be busy, I also network with a photographer group here in Baltimore and can reach out to them if necessary.
2. When can we expect to see the photos and how are they delivered?
Okay so this is probably the question everyone is eager to ask, but the “how” in this question carries a lot of weight! No one wants to wait six months for their photos (nor should they) anyone who is giving that sort of timeline is likely over booking themselves. As for the how, there are many different answers that could be given here. A mailed thumb-drive or CD is a less popular option now, most photographers likely have an online gallery where you can download or share. As long as they are giving specific answers here that you are comfortable with, you should be good!
My Answer:
Final images are delivered 4-8 weeks after your wedding date. You will receive an email with a link to an online password protected gallery where you can download the high res .jpg files and share them with friends and family! You or your family can also purchase prints of your favorite images if you so choose right from the gallery. The gallery will be available for 3 months, so be sure to download and backup. Once you have the photos downloaded, I recommend taking the same approach and always having two copies saved independently of each other.
3. What is your approach to posed vs candid?
You are really asking about a photographers demeanor when photographing. Some may be a fly on the wall, others may be more like a director. You should be comfortable with their level of interaction, but a good photographer will be adaptable to the situation!
My Answer:
For a majority of the day, I am sort of a fly on the wall. My goal is to document the day honestly because I believe with the amount of love and time you have invested into the event, it should not be overshadowed by any filter or interpretation on my end. That being said, I am not afraid to give guidance/advice to help your vision, its your event, not mine. When it comes to group photos and the classic posed shot, I am not afraid to project my voice and tell your Aunt Krissy to get in line! I have directed military generals, congressmen, and college students so when it comes to your family, I have no worries we can get them to stand still for 1/200th of a second.
4. Who owns the copyright and what are the restrictions on printing and sharing?
Copyright law can always feel daunting, and is often misunderstood, but this is something that will be written out in the contract so its a good idea to understand how they go about this. No photographer is going to give you the copyright to the image (unless you pay them a LOT of money) but thats okay! Because you don’t need the copyright to make prints or share the photos. There should be a written acceptable use policy the photographer grants you! Just make sure you understand and are comfortable with their answer, there can be room to negotiate here if necessary.
My Answer:
As the photographer, the copyright is automatically mine. The exact verbage which is embedded into all the photos, gives the client “a limited non-exclusive, non-transferrable, perpetual personal use license.”
Yes, thats a lot of scary sounded legal words but this means that you, and only you, are allowed to do whatever you want with the photos, as long as it does not involve making money off the photo. You can download them and share them online or with friends and family. You can make prints and display, even if its not through my print store and you can do this forever. If your vendors would like to use my photos, they will need to contact me directly for that permission. Now if your mom decides to get t shirts printed of your face thats fine (at least from a copyright perspective - though you may want to have a chat with her), as long as she doesn’t start selling them I am cool with it!
5. What is included in your pricing and are there any extra costs?
Budget Transparency is big! Especially if, like me, you decide to do like four major life milestones all within a year. I graduated college, found a job, bought a house, and got married all in the summer of 2019, lets just say the budget was tight for a minute. A good photographer will be up front and transparent about their prices.
My Answer:
Wedding rates: You can find my wedding packages at https://mikeguinto.com/couples. This will include shooting and editing time. Hourly rates are $350/hour
Travel: I do not charge for the editing time. If I am traveling more than an hour, I will add a $50 for every extra half an hour of travel beyond that for time/gas/mileage/parking. I do not charge extra for my return trip.
If the travel includes airfaire or extended travel, I can send you an estimate breaking down all the expenses.
Corporate rates: because event photography is so varied, I will send a project proposal/invoice catered to your organizations needs before any contracts are signed!
Print products: Any prints you wish to purchase are not calculated into the wedding packages, though the packages include a 15% discount off your first print order!
I hope this is a helpful guide to get you started finding your photographer! Remember that the best photographers are transparent, prepared, and aligned with your vision! Now that you are armed with the right questions to ask, lets talk about your event and see if we click! (pun intended)
Helpful tips for night time long exposure photography
Here is a guide with some helpful tips and tricks to taking better star photographs.
One of the most fun techniques in photography is long exposure. I love heading out on a warm summer night, finding a beautiful subject whether it be a tree or a water tower, or a lake and just watching the stars drift by. In this blog post I hope to give you some helpful tips that will save you time and frustration when starting out taking night sky photographs.
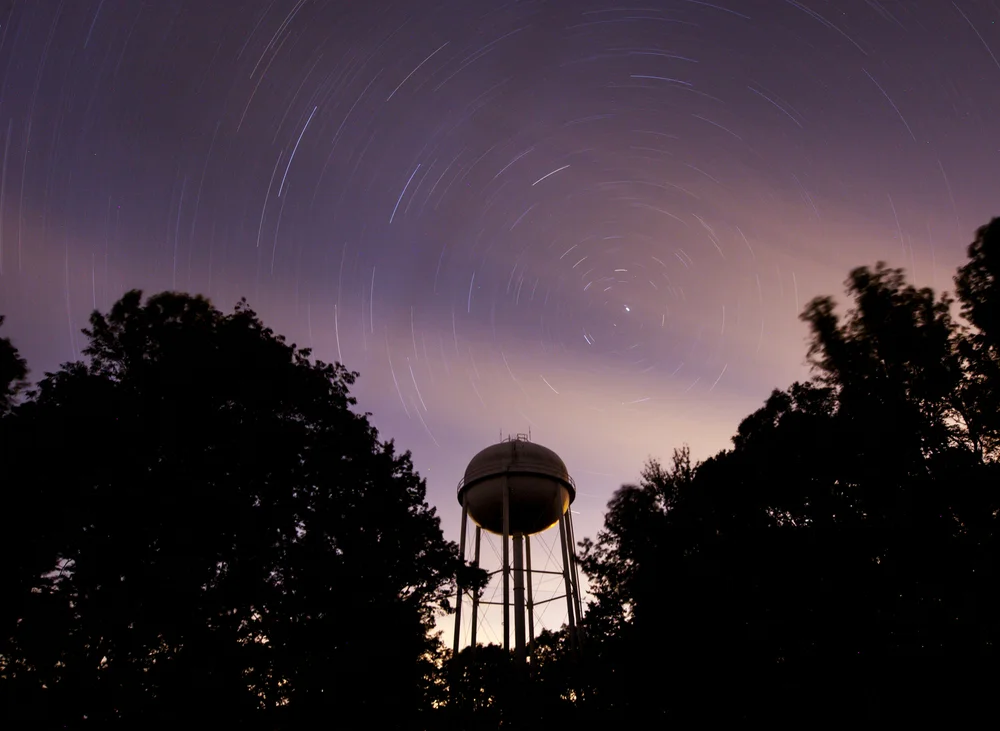
Equipment:
Camera: Make sure your camera has a bulb function or at least can go down to a 20 second shutter speed.
Tripod: after the camera, this is the only other part of this I would say is a requirement You can usually work around everything else, but a solid tripod is the most important investment for long exposure photography. This doesn't mean you need to go buy a $500 Manfroto, but as long as it will hold your camera still and the screw doesn't come loose mid exposure you will be fine.
Wide Lens: Wide lens captures more stars because you have a wider field of view. If you are trying to make the moon look big, go for a telephoto, the longer the better. Ideally you want a lens that can open to at least F2.8 - for more info on len's you can check out my post on What the numbers on lenses mean.
Remote Shutter: This will just save you time. A remote shutter allows you to press the shutter without actually touching your camera. Each time you touch your camera you shake it ever so slightly and it can show up in the photos. For this reason, some of the most expensive cameras have seismographs inside them! If you don't have one, or forget to pack it, one trick I like to do is turn on the delay shutter timer. originally used to give the photographer time to jump into the awkward family photo, now can be used to delay the shutter until the camera stops shaking.
Deck of Cards: When taking long exposures, especially if you are doing a straight 2 hour exposure, you might want something to do while you wait. Other recommendations if you don't like solitaire are a chatty friend, a telescope, or a good book.
Step 1:
Prepare.
Remember the 5 P's. Preparation prevents piss poor photos. I usually scout out places I want to photograph during the day time. Look for a cool landmark or a beat up rusty truck. You are going to want to look for something at least 20 minutes outside of a city or 45 minutes if its a big city like NYC or Chicago. If you are in California, just head for the hills or the desert. You are also going to want to look at the moon calendar. Plan to go on a moonless night, anything larger than a quarter moon drowns out a lot of potential stars. The moon as well as city lights make the sky brighter at night which means your camera wont be able to pick up the fainter starlight.
Step 2:
Set up your shot
Set up your shot how you like it and try to throw some sort of compositional technique in there. Rule of thirds, leading line, Symmetry, any one of those will make it look like you know what you are doing!
Now one of the questions I have been asked is how do you get your focus?! And It took a little creative problem solving to figure out. What I do, and it has not failed me yet, is flick off the automatic focus setting. There should be a switch on your camera and usually there is one on your lens. Switch it off of A or MA and bring it to M. Manual Mode will allow you to set a focus on a certain point and it wont move when you click the shutter. Next I shine my phone-screen's light on my lens to help me see the markings on it, set the focus ring to the infinity symbol. It is usually about a 1 degree rotation in from the very end. Once it is set, don't touch it.
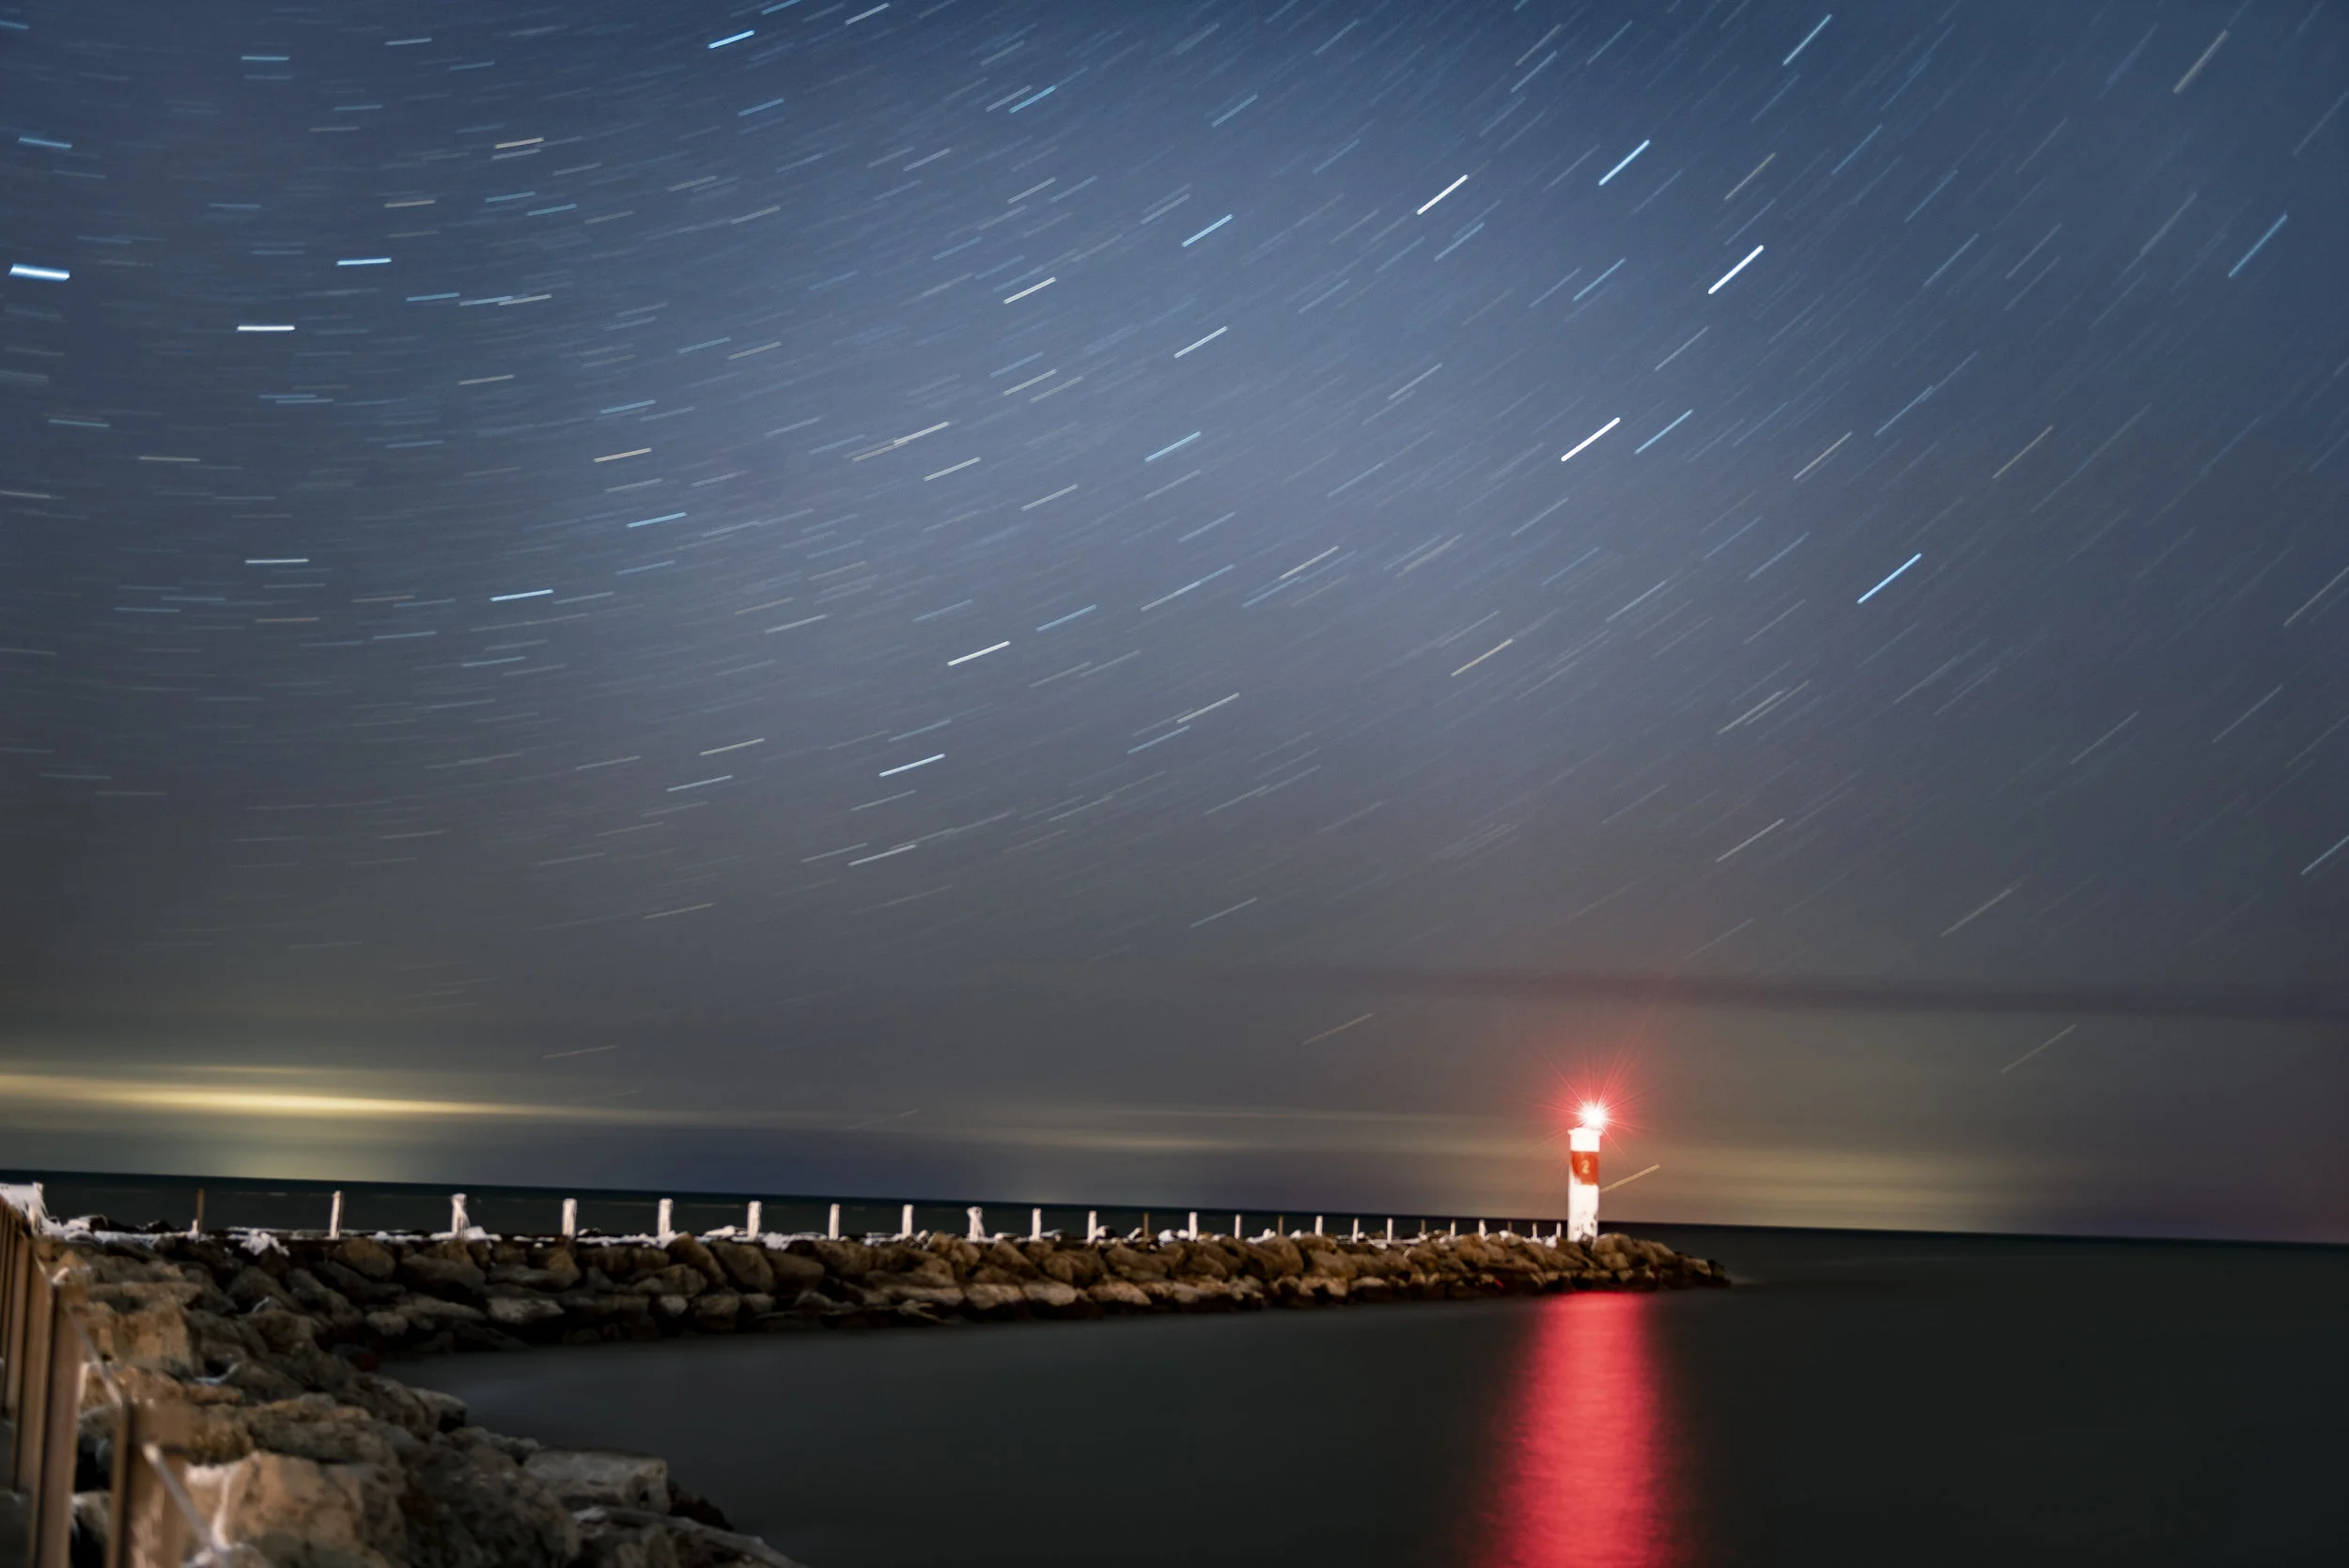
Now your settings are going to be different based off your camera, your lens, and how much light pollution is in your sky, so play around with the settings. Set your White Balance to Sunlight or 5500K and put your quality on RAW for best results. A good place to start is ISO 1600 / F2.8 (or as low as you can get) and set your shutter speed to 20." I find at 30" you have actually had the shutter open long enough to catch a little bit of motion blur in the stars from the earth's rotation.
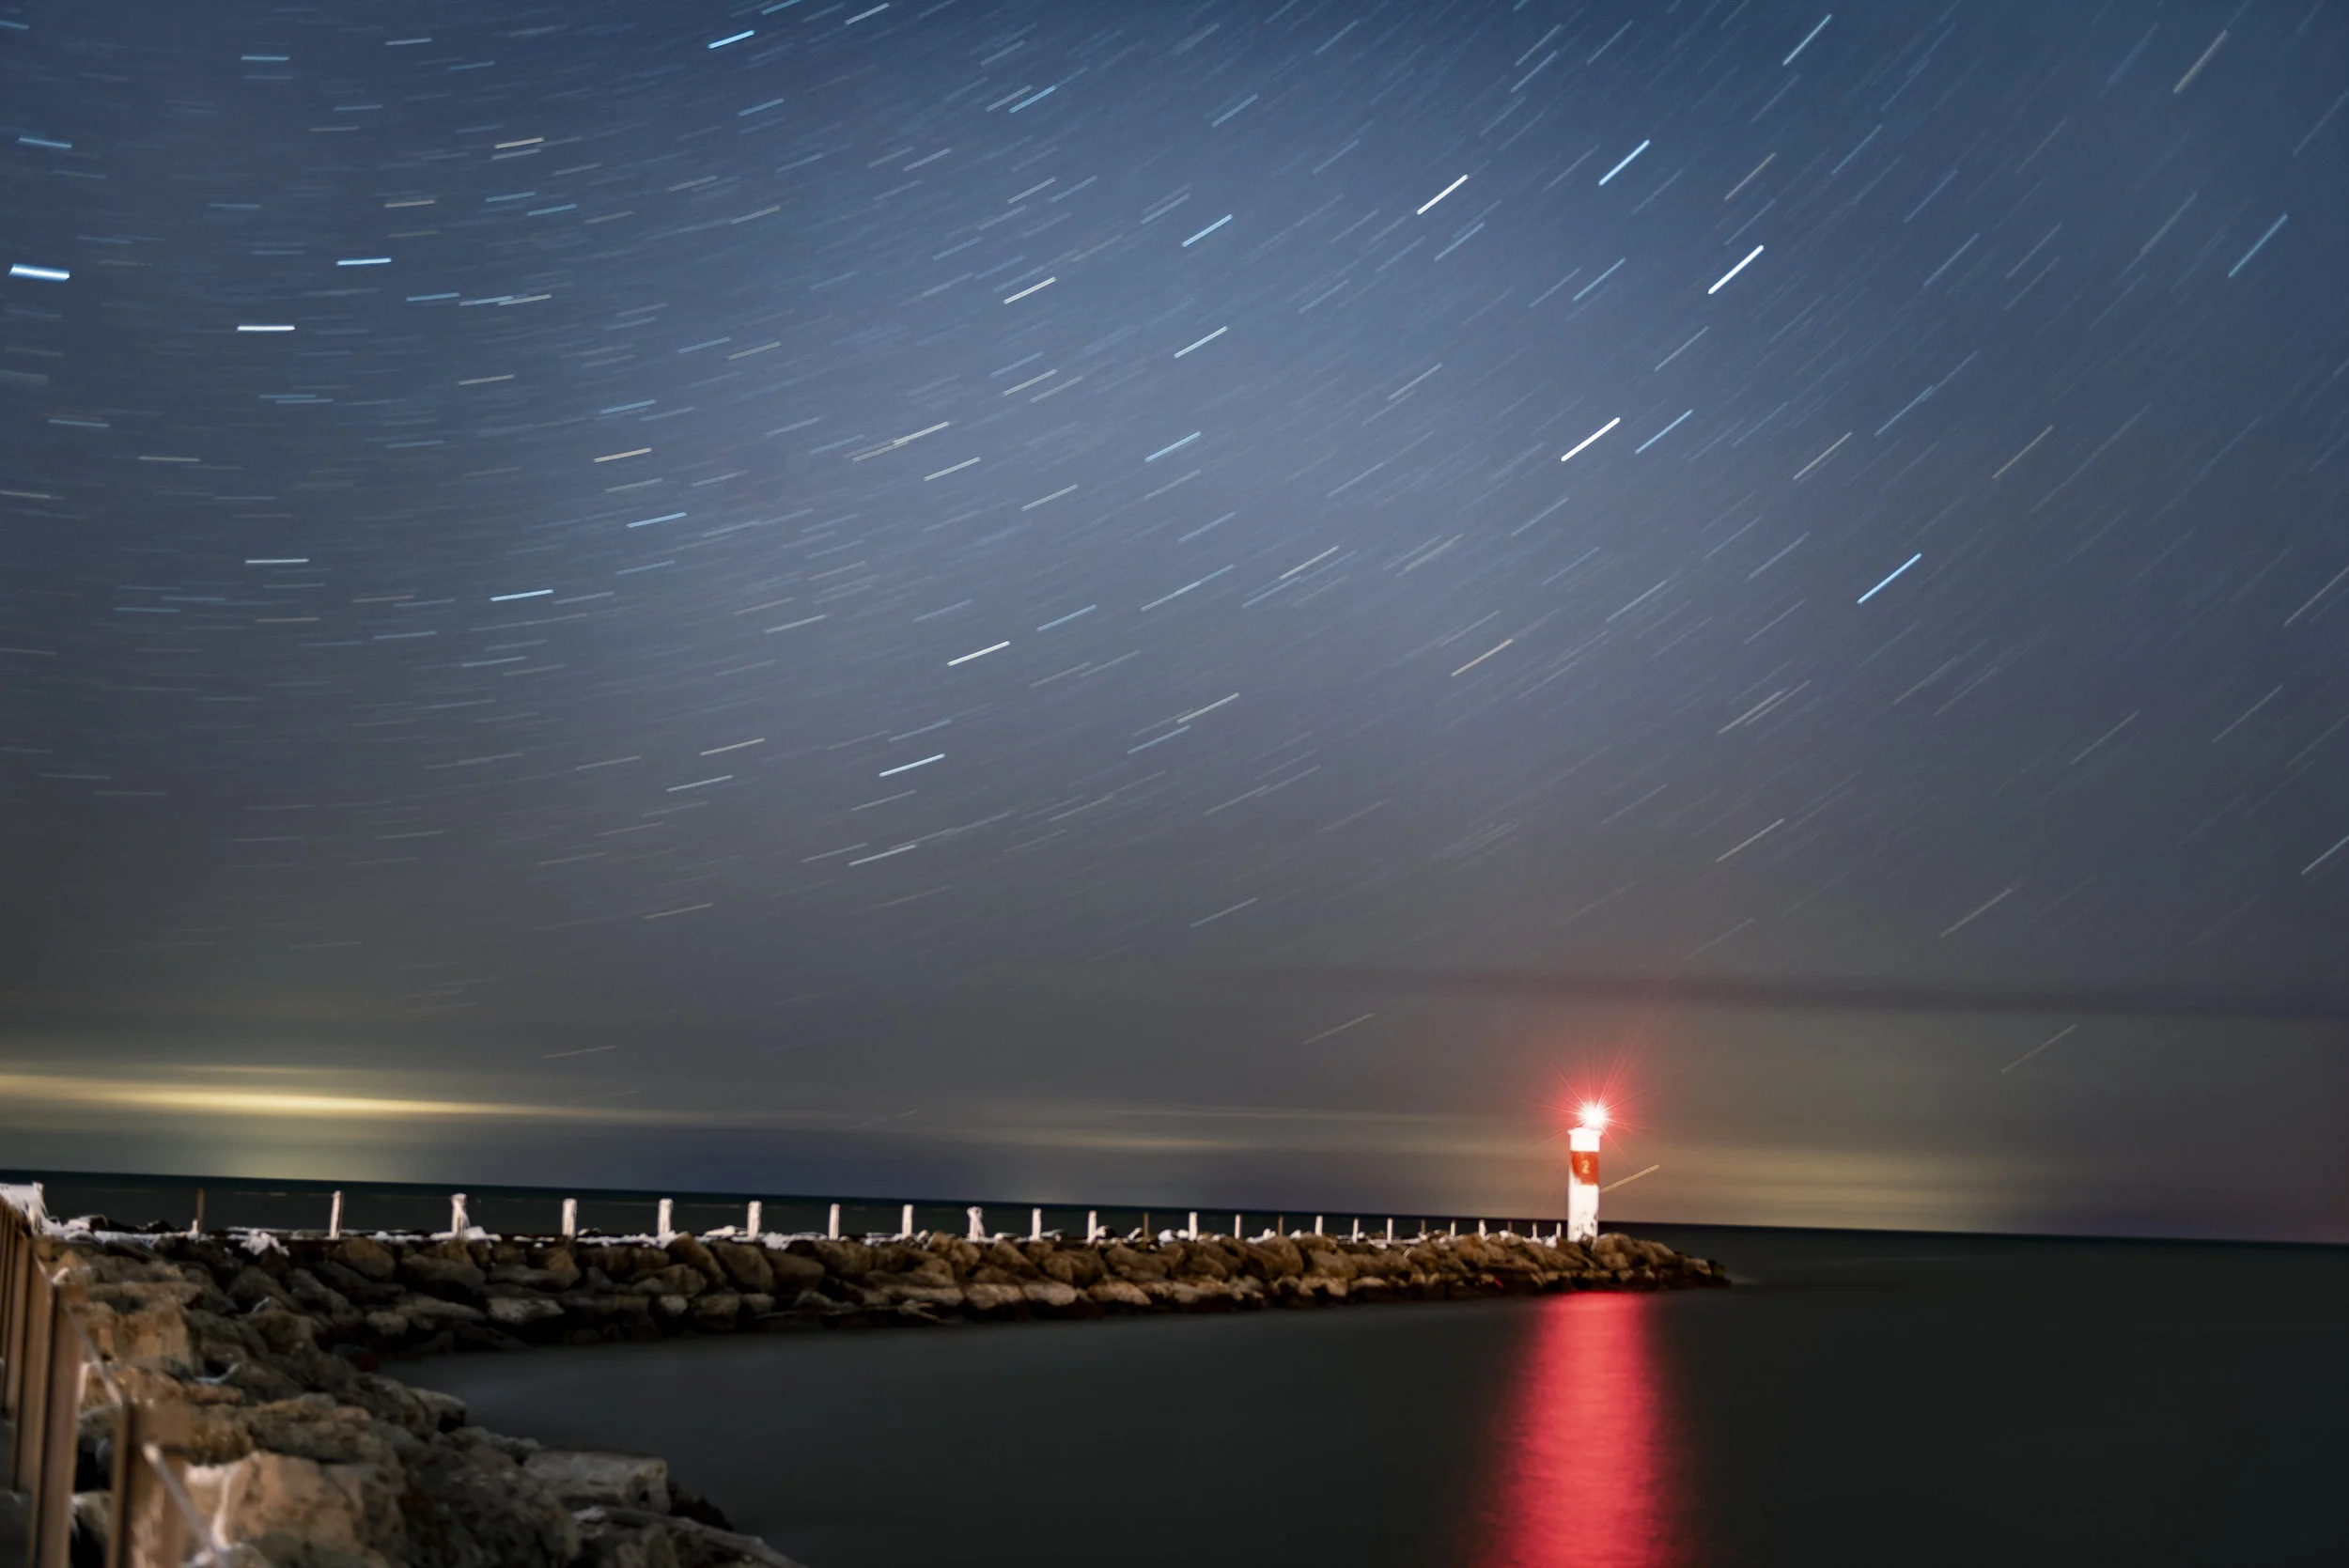
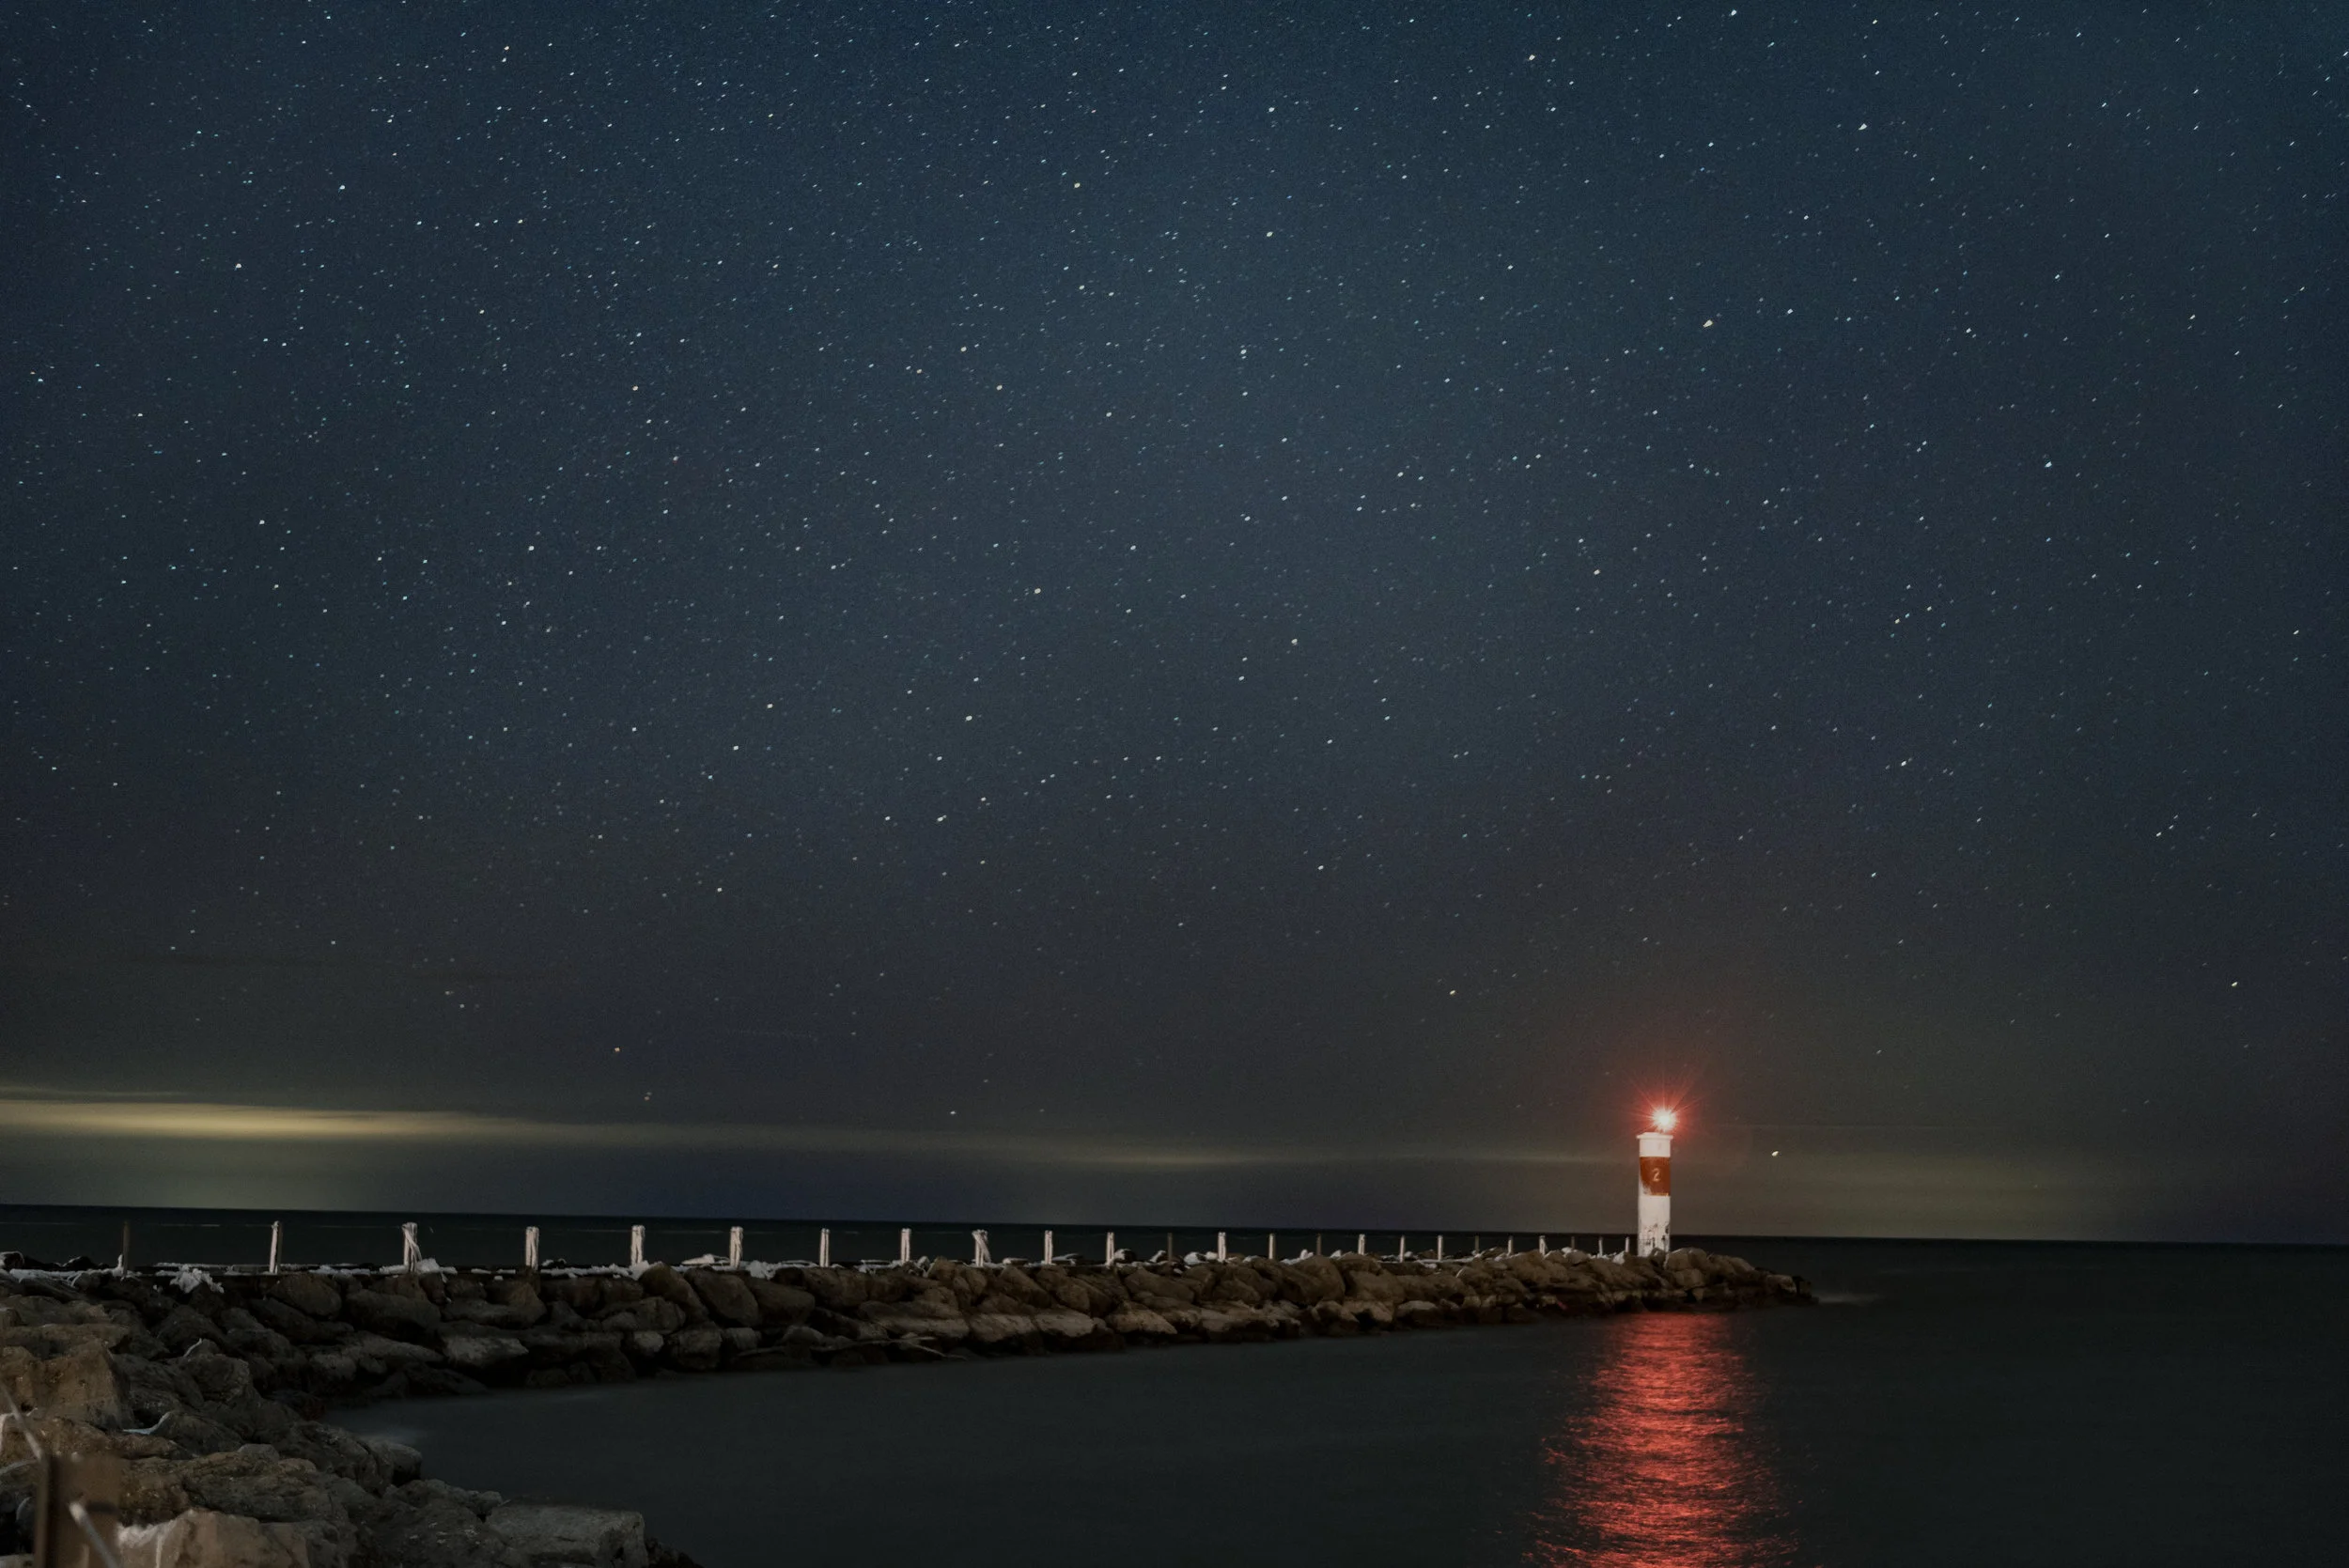
With any luck you should get something that looks like this...
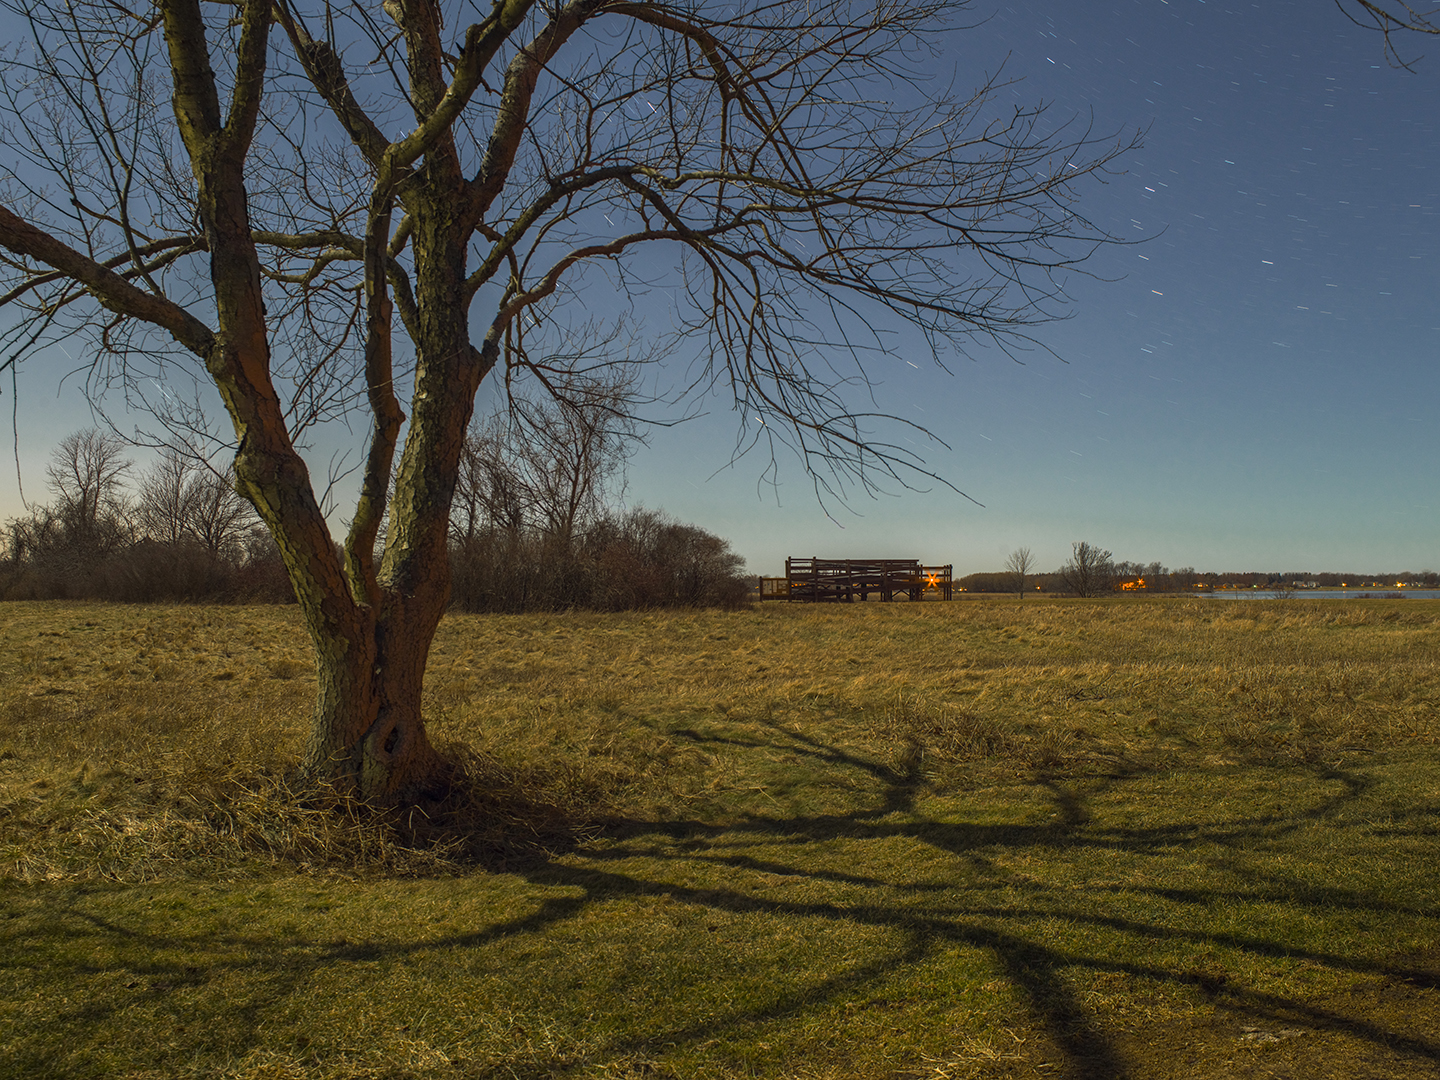
Just for reference, this next photo was taken on a night with a half moon... notice how fewer stars there are and how the moon actually creates a shadow. The photograph looks like it was taken during the day if not for the stars and lights in the background.
Things to keep in mind:
Notice in the second photo how fewer stars you see because the moon is polluting the night sky with light. City lights are even worse which is why you need to travel so far from any big city. If you can put mountains or a large body of water between you and the city, the darker it will be.
Most night sky photos you see on instagram are more than likely composites. Basically photographers take a lot of photos only 10 seconds to a minute long and they stack them together to create what looks like an hour long exposure. It is a really neat trick which can save you the risk of taking a 2 hour photo and having it be overexposed.
The other composite technique which is more common (unfortunately) is to drag and drop a sky from a different photo and put it over a photo of something else. While it may look really pretty to your average instagrammer, you have to realize that this is an unrealistic expectation to have when going out to take night photographs. Personally, I think this technique is cheating, but who am I to judge... Example1, Example2, Example3. At what point do these images become digital art and not photographs?

Now, in order to see the milky way, you have to be looking towards the milky way. I like to use star mapping apps to help me locate certain celestial objects.
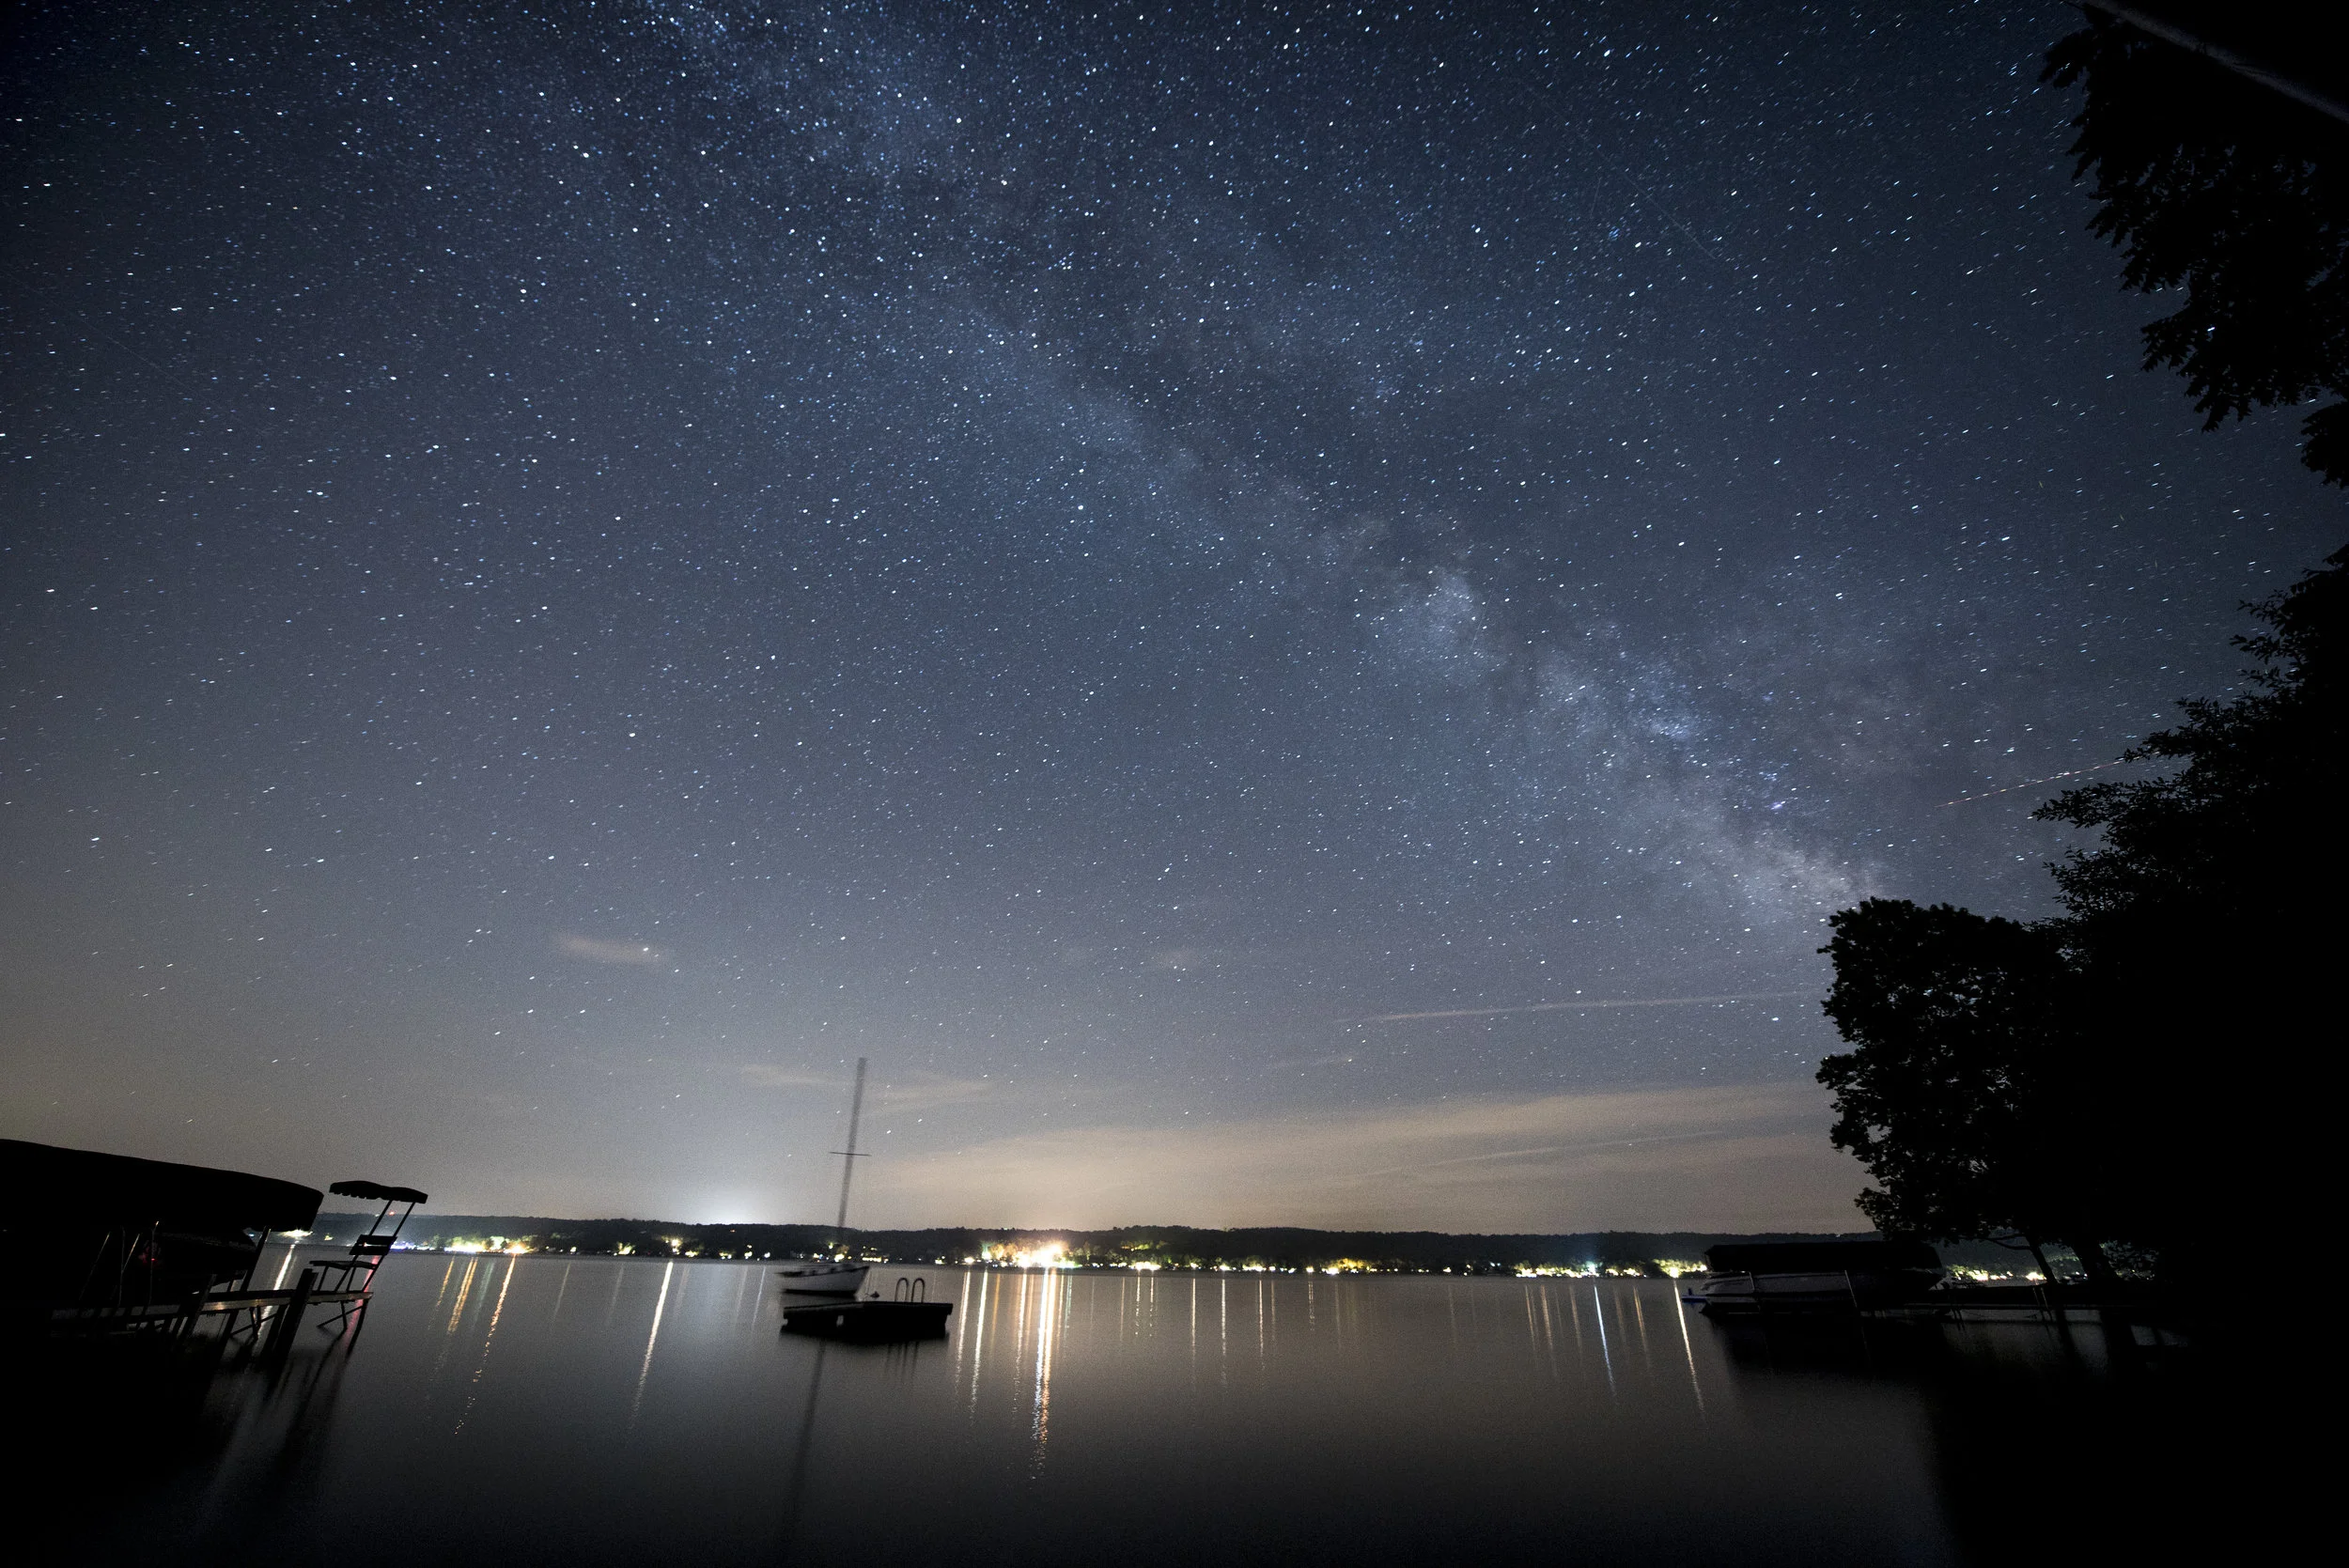
Notice how the lights along the lake actually blot out the stars. If you can spot the milky way with your naked eye, it will show up easily in a photo. Here we see it stretching from the southern sky (camera right) up and over the lake.
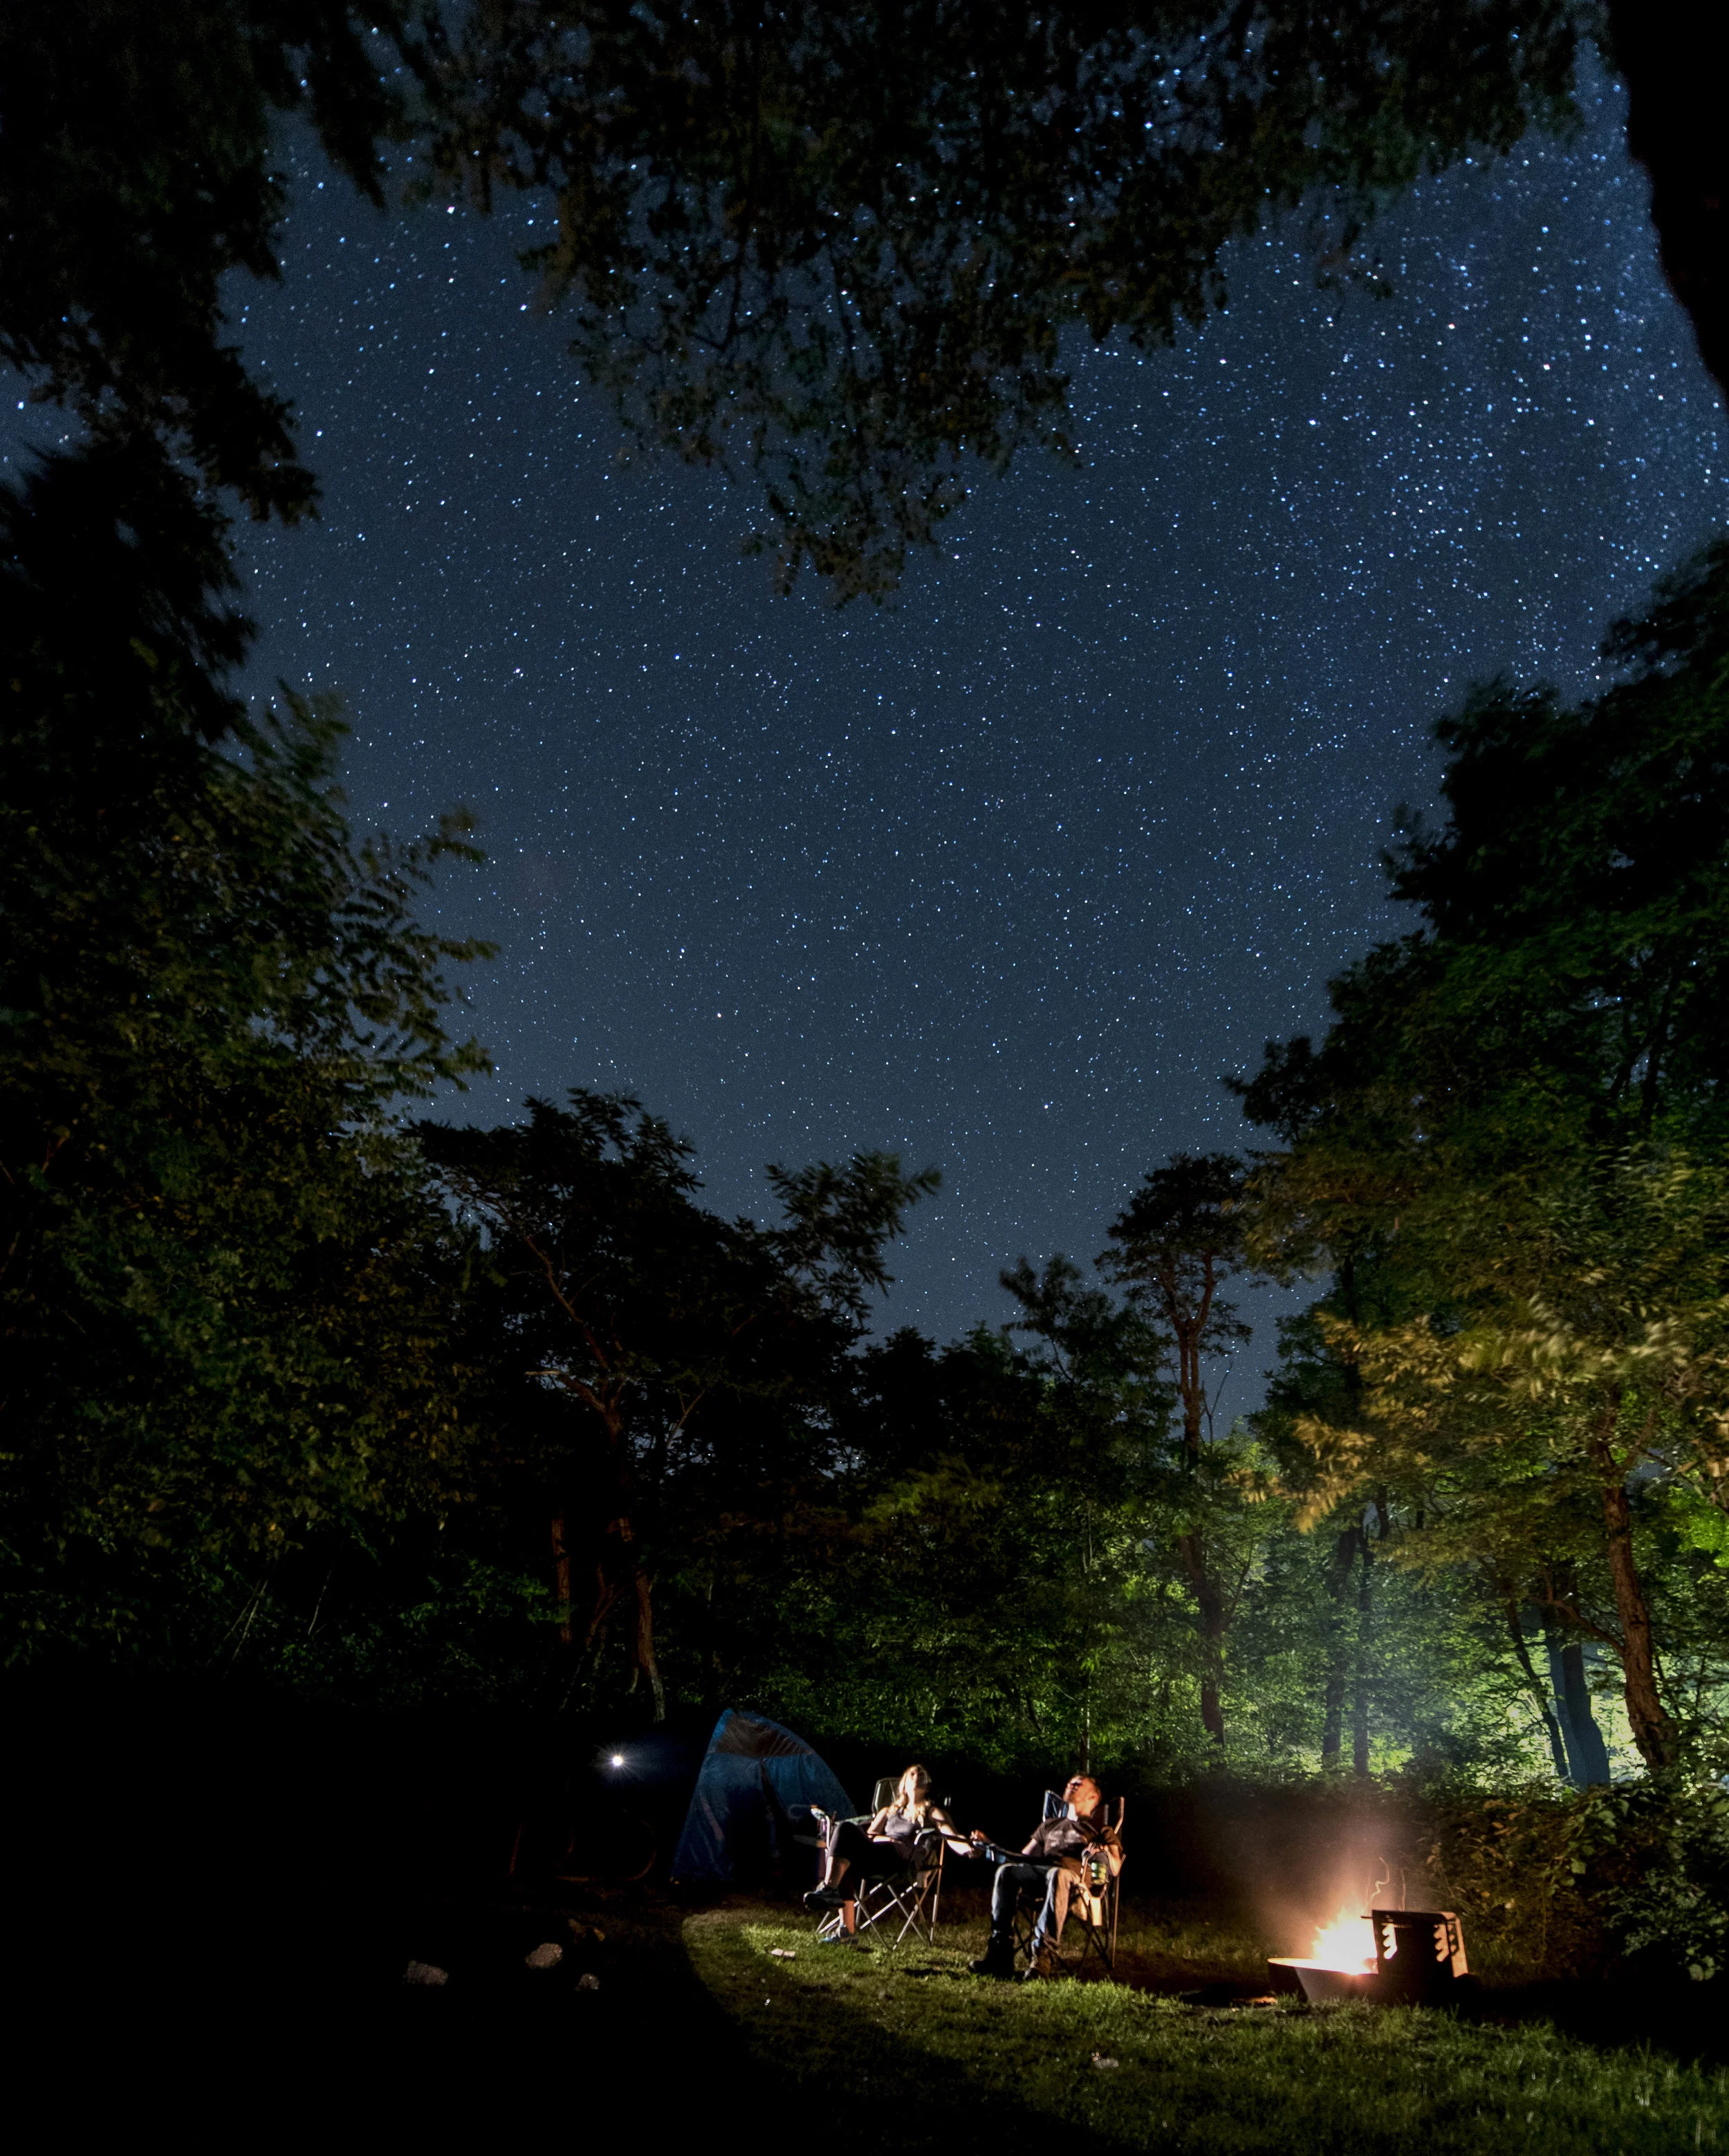
Some of the best star shots in my opinion are ones where the stars are simply a backdrop to something else. Play around with negative space. Here I used a low hanging branch to dip in creating the shape of a heart in the treetops. Using a campfire and a flashlight I was able expose for my fiance and I underneath the stars on a camping trip to finish a romantic themed photo. This was during our weekend getaway to the Shenandoah Mountains.
Give your audience an anchor, some subject matter other than just a sky full of stars. This will add interest to any photo. Make the stars secondary to the image. The best photos in my opinion show us something in a way we don't often see it.

One last thing is when you get back to your computer, go gentle on the post processing. It is very easy to want to slam your contrast and clarity and saturation all the way up, but it will just end up making the image look dirty.

Thank you for reading, I hope this helped. If you have any more questions about star photos or want to learn about something else photo related, leave a reply in the comment section!
You can also follow me on instagram.
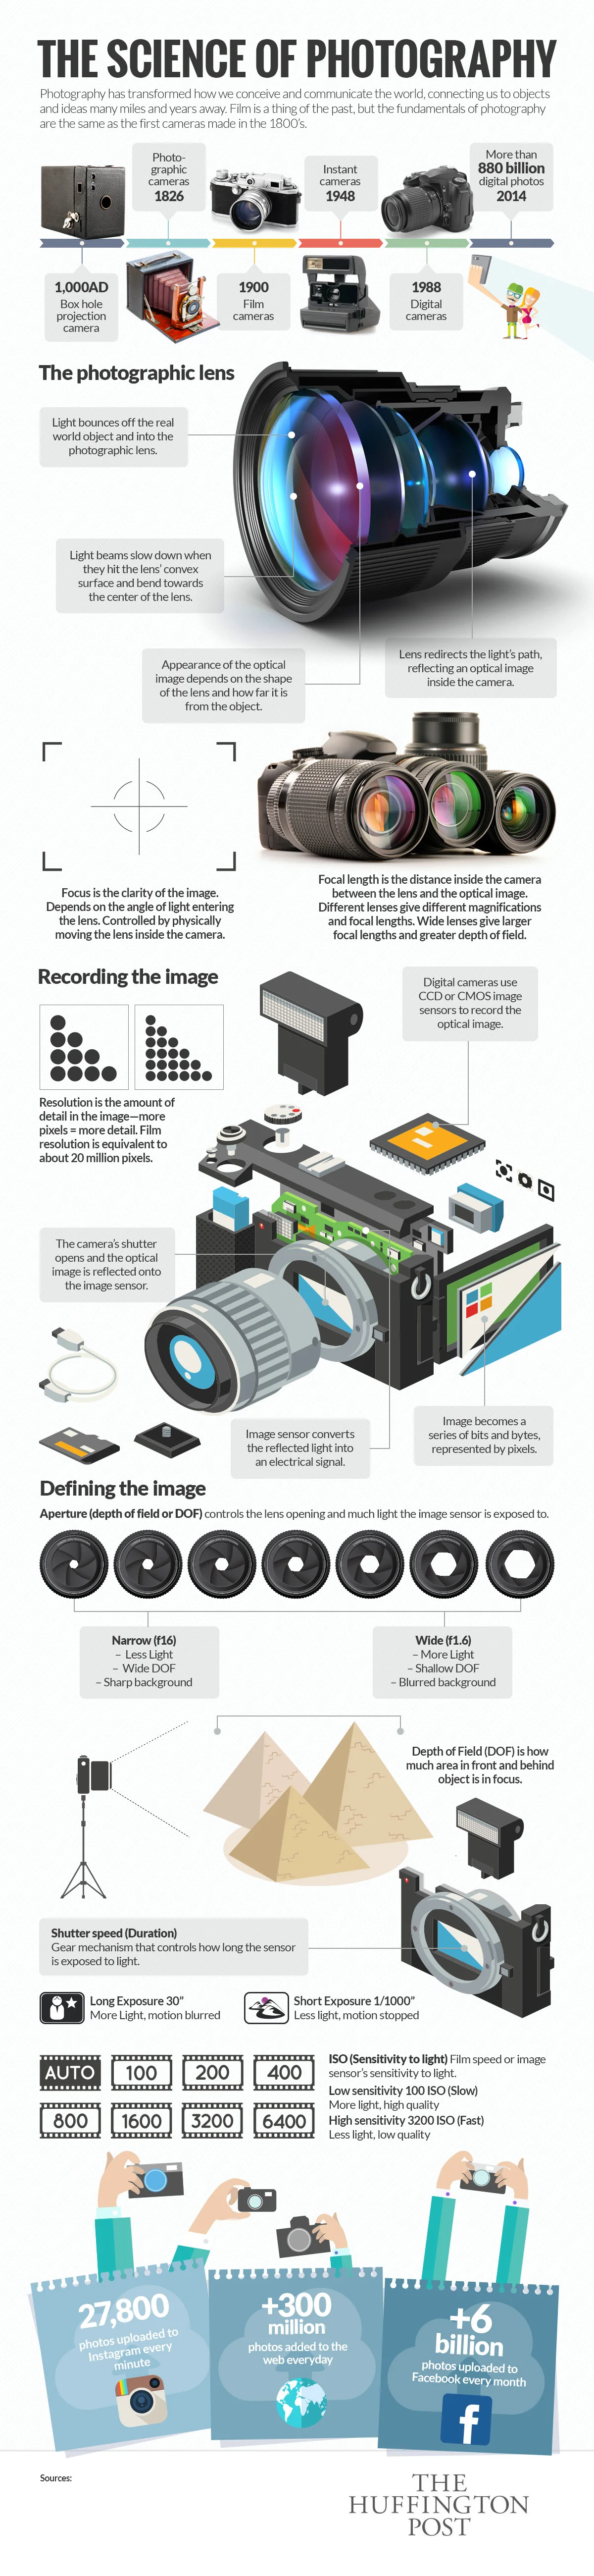
Photo Guide Infographics
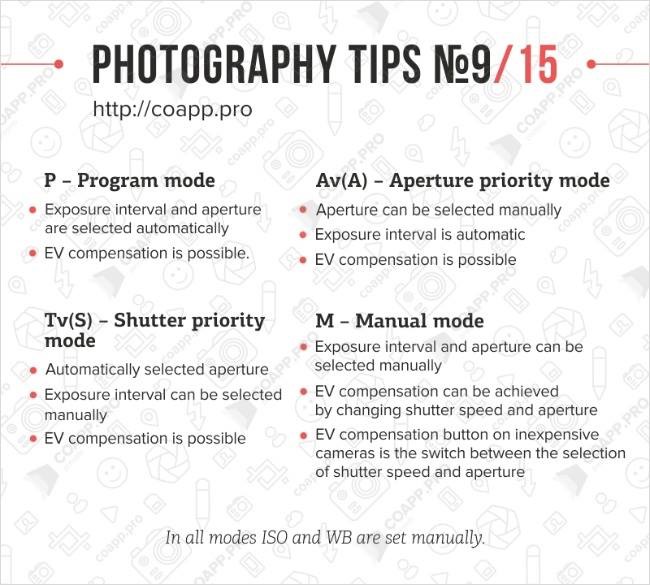
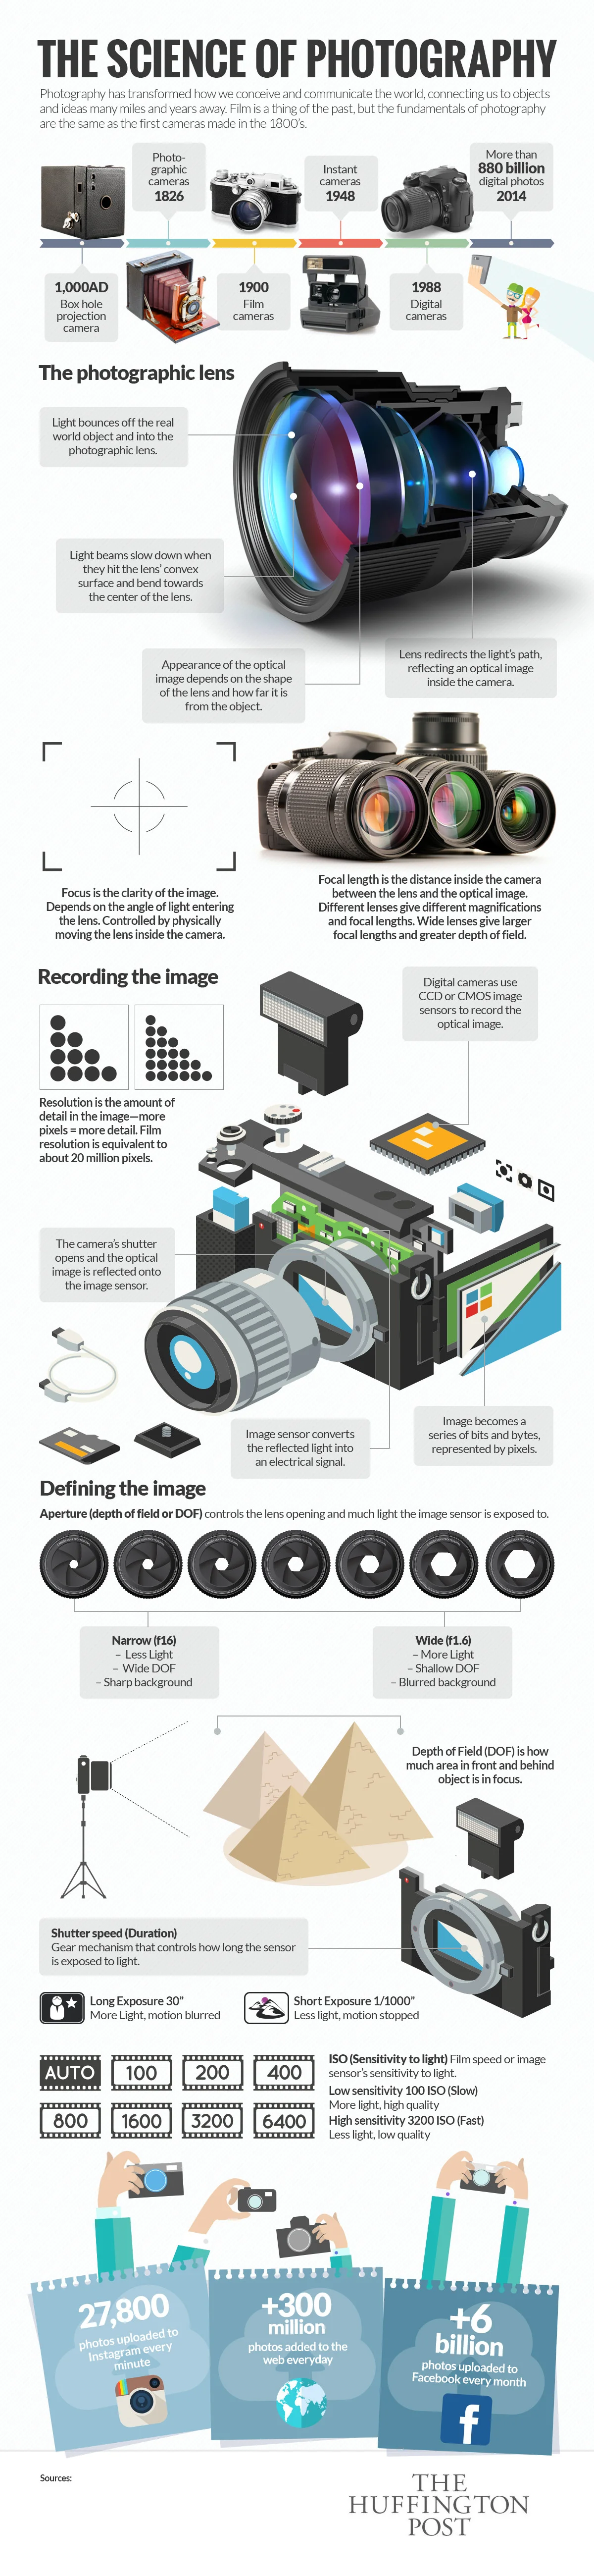
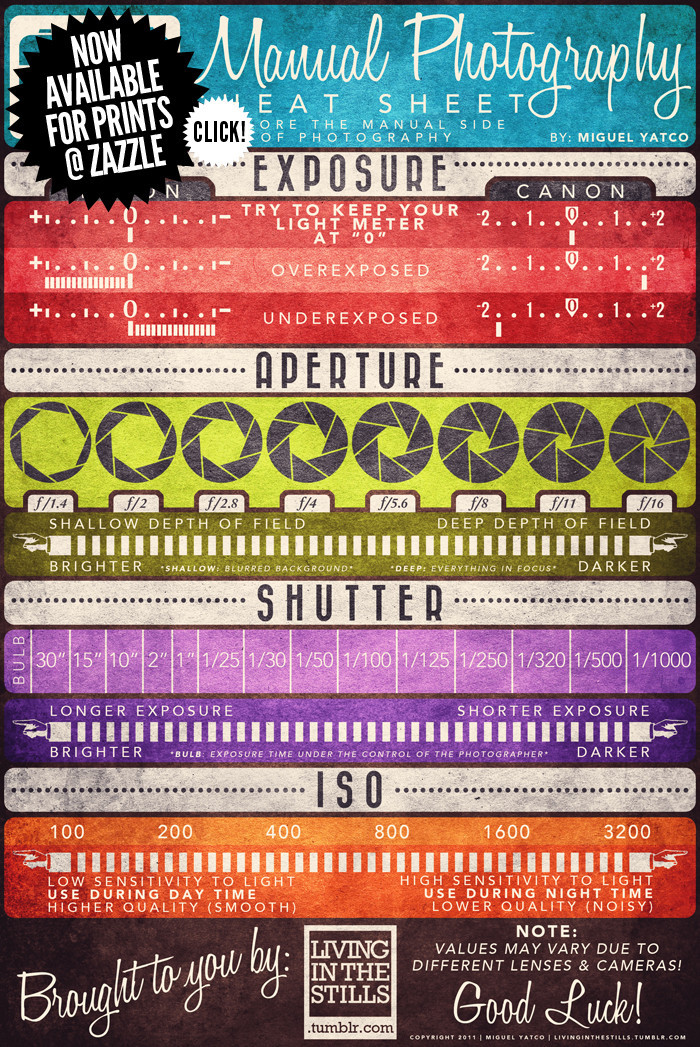
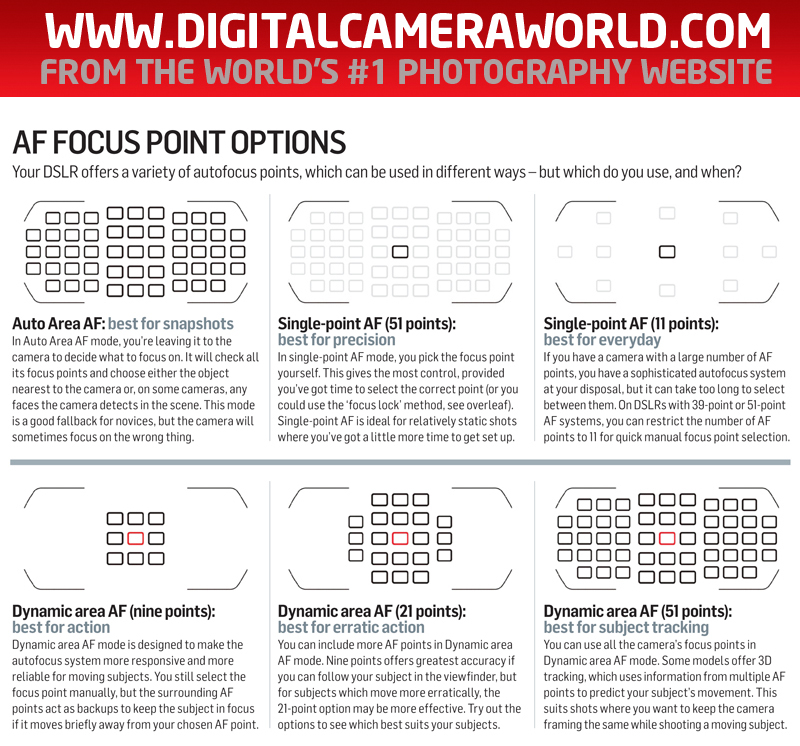
Here are some well organized infographics I found that can help you understand photography! I will be sure to keep updating as I find more.